
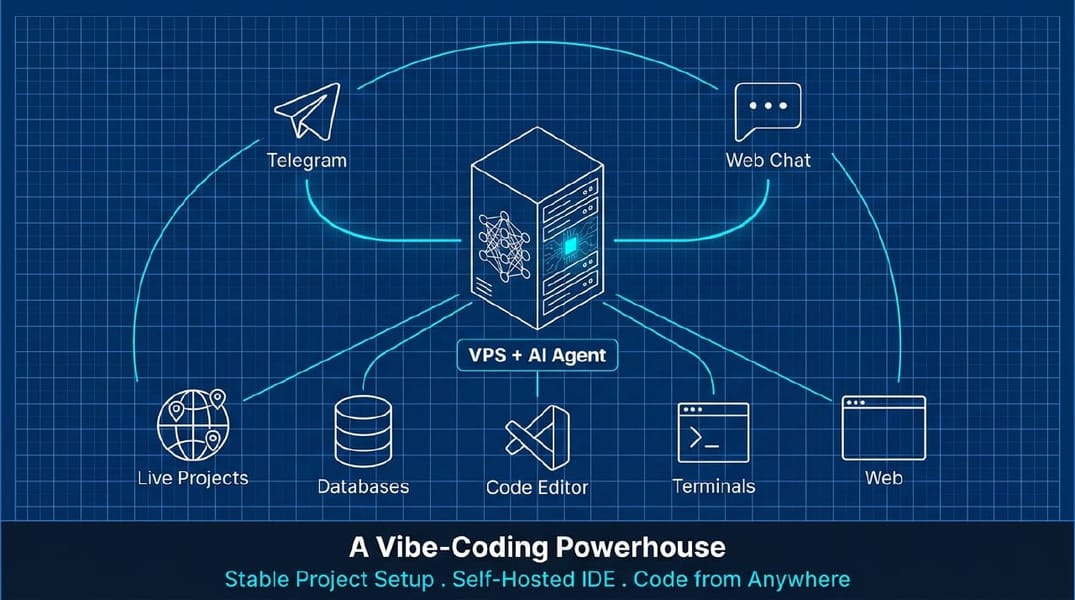

I have been vibe coding since 2022. Till November 2025, vibe coding was just at the project level with Claude Code, Cursor, Lovable. No permanent memory. No dedicated environment. No way to manage multiple projects without losing your mind and can't remember your preference through multiple projects.
This results into you wasting tokens/requests on messages like "You are dumb, we just implemented that feature yesterday, How can you forget!", or "I told you not to use this library before, You messed up my whole project" and stuff like that. Highly relatable, right? I did the same thing till the end of 2025.
With the launch of Openclaw, Hermes and other agents, The game is now changed!
Now you can have a dedicated machine with your agent, alive 24*7, listens to you from multiple channels, even calls, voice notes, and simple messages. It can:
- Permanently remember exact project details and your permanent preferences.
- Permanently follow the instructions that you have given once.
- Deploy and manage multiple projects for you.
- Create new environments from scratch to support specific projects and frameworks.
- All while keeping everything secure, neat and clean.
Setting up this environment on top of the base Openclaw is a multi-step process. That's why I am writing this step by step guide.
After following this guide, You will have an Openclaw environment where you can:
- 1 Shot MVPs.
- Read the code and changes via VSCode (Yes!)
- Access and manage terminals via VSCode
- Develop complex projects over time just by chatting with your agent.
- Have multiple agents working on your project.
- Have your AI agent work autonomously on your projects, while you sleep.
And, You don't need any technical knowledge or CLI knowledge to follow this guide. If you are a technical person or a developer, it is a plus point because you will be able to understand and adapt to the whole setup very easi
Prerequisites
Here is what you need, and I assume, You have already:
- A VPS/Mac Mini/ Or any device with complete Openclaw setup.
- Basic knowledge of DNS management. (Optional)
- Openclaw user with sudo access (default on ClawVPS instances)
If you don't have an Openclaw instance yet, You can quickly deploy one on ClawVPS for free, follow this guide.
That's all, Once you have an Openclaw instance, You can move forward.
Step 1: Prompt for Initial Setup
As I mentioned before, we don't have to touch the CLI. We will simply prompt our Openclaw AI agent and it will help us set up this whole environment.
Send the following prompt to your Openclaw AI Agent:
1. You have sudo access on this environment.
2. Check for existing setup extensively before doing anything that can break things.
Install and setup the following on the server:
1. Nginx (Only If not already installed - check /etc/nginx to confirm)
2. Install common development related dependences we might need in future. For example: build-essential, zlib1g-dev, libpng-dev, libjpeg-dev, libxml2-dev, libxslt1-dev, libyaml-dev, sqlite3 & libsqlite3-dev, redis-server, libssl-dev, Let's Encrypt.
It will take anywhere between 5-15 minutes depending on the resources available on your VPS or device.
In this 5-15 minutes, Your Openclaw agent will execute all the necessary commands on the server and update all the required configuration files to complete the setup.
If you are using Openclaw's Webchat UI, You will be able to see the tool executions and output. If you are curious, you can also open the tool executions to see what commands it is executing.
The final output should look like the following:
Nginx:
- Version: nginx/1.24.0
- Running and enabled (auto-start on boot)
- Default page served at your server's IP
Development Dependencies:
- build-essential — C/C++ compiler toolchain
- zlib1g-dev — compression library
- libpng-dev — PNG image processing
- libjpeg-dev — JPEG image processing
- libxml2-dev — XML parsing
- libxslt1-dev — XSLT transformation
- libyaml-dev — YAML parsing
- sqlite3 + libsqlite3-dev — SQLite database
- redis-server — in-memory key/value store (installed, not started yet)
- libssl-dev — OpenSSL development files
Want me to start Redis and configure nginx for something specific?
Once you get the final output from Openclaw, Your machine has the fundamental tech stack done. Upon that, your agent can install and configure whatever specific things it needs while developing your projects.
Step 2: Prompt for Managing Projects on the Machine
By default, when you just ask it to "Deploy a new project", It can deploy your project in any directory, and it might not remember it correctly if you have not instructed it to do so.
We need a better structure to manage projects consistently on the server. Also, Your projects should be publically accessible (So that you can access it from anywhere with proper authorization) as well as secure via SSL and password (if required).
So, every time you ask it to deploy a new project, It should follow the same pattern it has used every time to deploy a project securely on the server. And, it should know where to look for when you ask it to get the list of projects you are working on.
Here is the prompt that we will send to our agent for this purpose:
Whenever I ask you to deploy a new project on this machine, Here is how you build the skeleton of the app on the server.
1. Make a directory structure in
/var/www/PROJECT_NAME/public_html2. Make "logs" directory under
/var/www/PROJECT_NAME3. Make a dedicated Nginx site file with nip.io domain with appropriate project name, pointing to correct directory or reverse proxy depending on the project framework.
4. Issue an SSL certificate for the project using Let's Encrypt (install certbot if not installed already).
5. Make a dedicated PHP-FPM pool in case of PHP apps. Or, make a permanently running backend based on the framework to which you can set up nginx reverse proxy.
6. When I ask you to deploy a new project, always verify with me if the project should be password protected or accessible publically. If I mention the project to be private, set up basic auth on the project, protect it with strong password and save it for me.
Deploy a test WordPress site on this server right now to check if the process works.
Similar to the first prompt, It might take about 10 to 15 minutes to complete the whole process and save it in the permanent memory for the future.
Once it is done, Every time you ask it to deploy a project for you, Here is what you will get:
- Your project will have a domain name with nip.io. It is a wildcard DNS resolver. You don't have to mess with DNS at all - for development purposes.
- Your project will be password protected (So people can't access it randomly without authorization).
- Your project will be protected with SSL from start.
- You agent will always know where and how your project is managed. No random directories, easy and secure to manage.
Once your agent is done with various tool executions and dependency installations, You will get a final response just like the following.
✅ Deployment process permanently documented at
/home/openclaw/.openclaw/workspace/DEPLOY.md and I have added it to my main memory as well as tools file.---
Test WordPress site: https://wordpress.178.105.117.249.nip.io
It's already redirecting to the WP setup config — so PHP-FPM, MariaDB, nginx, and SSL are all passing traffic correctly.
What was built:
| Component | Path/Details |
| Web root | /var/www/wordpress/public_html/ |
| Logs | /var/www/wordpress/logs/ |
| Nginx site | /etc/nginx/sites-available/wordpress |
| PHP-FPM pool | /etc/php/8.3/fpm/pool.d/wordpress.conf (php8.3-fpm-wordpress.sock) |
| MariaDB | wordpress DB, user wordpress (check MySQL for password) |
| SSL cert | Let's Encrypt at /etc/letsencrypt/live/wordpress.178.105.117.249.nip.io/ |
| Auto-renewal | Certbot systemd timer enabled |
Installed globally for all future projects:
- PHP 8.3 FPM (with all common modules)
- MariaDB 10.11
- Certbot (snap)
- nginx already had our existing openclaw site on witty-matrix.clawvpsapp.com
Next time you want to deploy a project, just give me the name and framework — I'll follow the steps in DEPLOY.md automatically.
Just like that, Your project is live on a domain name with SSL, and no DNS mess! In this example, We gave it a task to deploy a completely new WordPress site for us. But there are no limitations. You can now ask it to deploy any self-hosted app, any new project on any framework, and your agent will deploy it for you with domain name, SSL and it’s own directory structure.
Now, Let's move on to the third and the last part. The IDE.
We can't call it an development environment if we don't have an IDE on the machine.
In this case, we will use code-server. So, Let's install it.
Step 3: Prompt to setup Code Server (VS Code)
VS Code is one of the most powerful and my favourite IDE.
Luckily, You can also install it on the remote server and access it from the browser. You will have the same experience but you will be developing projects and editing files on the remote server, rather than your own laptop/PC.
We will install self-hosted VS Code on our OpenClaw VPS so that we can keep track of what our agent is exactly working on and also make changes manually if required (if you are a developer).
To install VS Code, Send the following prompt to your agent:
1. Set up proper Nginx site config for vs code.
2. Use the nip.io domain name with "vscode" app name.
3. Issue an SSL certificate and configure it for our VS code.
4. Make sure it stays live 24*7.
5. Execute VS code as a root user so I can edit any project anytime.
6. Secure it with strong password, save it in your memory. So that you can provide me the info whenever I ask for it.
It will take some time to complete the process. Once it is complete, You will have an IDE that you can access from literally ANYWHERE! You don't even need your PC with you to work on the projects.
After completing the whole process, Your agent will return you the similar message:
🚀 VS Code: https://vscode.178.105.117.249.nip.io
| Detail | Value |
| Password | 4TUAKT95EzzxnoeyYuTyn3vTynnjk |
| Runs as | root (full system file access) |
| Service | code-server via systemd, enabled 24/7 |
| Config | /var/www/vscode/config.yaml |
| Backend | code-server 4.99.0 on port 8080 → nginx SSL proxy |
| SSL | Let's Encrypt auto-renews on 2026-08-19 |
The password is stored in
/var/www/vscode/config.yaml — ask me anytime and I'll retrieve it. Since it runs as root you can edit any file on the system from within VS Code, including all the project directories under /var/www/.Both the deployment methodology (
DEPLOY.md) and the VS Code details are now saved in workspace memory.
Now, You will be able to:
- Access and edit the codebase of all of your projects from anywhere. Your development environment stays the same.
- Access terminals and run commands yourself from VSCode.
- Monitor what changes and logic your agent is applying in your code.
So, That's all it takes! Just 3 detailed, targetted prompts to set up a complete, remote, development environment with awesome vibe coding capabilities.
If your agent is connected with your Telegram, You can basically send messages on Telegram to provide different tasks for different projects and your agent can work on multiple projects at once!
Finally, Let's move on to the final step, that is to make sure your agent follows best practices and have disaster recovery plan in case something goes south at any point in time.
Step 4: Prompts for Best Practices
Right now, We have structure, security and stability for the projects.
But, Your agent can still push to git repository just after making a big change that has broken code. It may keep the debug routes that it makes to test something and forget to delete that. And there are 100s of possibilities that can happen based on your prompts.
To make sure it doesn't happen, Here is a prompt containing best practices that I learned from 3 years of vibe coding experience.
1. For any git repository, existing as well as upcoming, You don't ever commit and push without explicitly confirming.
2. Always cleanup debug routes before you ship to production — no debug logs, no exposed test endpoints, no verbose error messages that could leak internals.
3. For all the projects, Write unit tests as well as security tests.
4. Never run destructive commands (
rm -rf, drop, truncate, etc.) without explicitly asking for confirmation first.
That's all you need to do to set up a complete vibe coding development environment for yourself. Your agent lives there 24*7, works for you just by chat. You can also code with your agent as you also have VS code installed in your vibe coding environment.
What's Next
Hit /new !
And start building!
To try something, If you have followed this guide exactly with the same prompts, Your environment will have a test WordPress site we deployed.
You can simply execute the following prompt to create your own SEO plugin for WordPress:
Perform: Create a custom, lightweight SEO plugin for us. It should allow us to set meta tags for Google, Twitter, Facebook and other platforms for all the posts and pages. It should also have settings to enable/disable the sitemap. Wire it up correctly, run the required tests and make sure it is fully functional.
Or, You can ask it to deploy a completely new project/app based on your Idea!
There are no limits now. You can quickly create stable MVPs instantly with a few prompts. I am using this exact setup and my own vibe coding environment has 20+ projects including internal tools, some MVPs, and some very serious, complex projects.
That's everything you need for now! I hope this setup will vastly improve your vibe coding experience. And I will keep updating this article to keep it fundamentally up to date with my environment.
If you liked the idea and the setup, Subscribe to the newsletters. I am going to create few more articles on the major use cases of Openclaw and other AI agents.